Showing posts with label DIY. Show all posts

Friday, January 10, 2014

Deer + Silhouette = Art {DIY}

Silhouettes as well as deer are one of the "it" things right now. Want to make the "it thing" happen in less then 10 minutes? {This is were you jump up and yell YES YES YES!!} Well your pretty lucky because we are going to tell you how! :)

All you need is a sharpie, computer/printer, scissors, and paper!

Get your deer image here!

You can really do this with any silhouette, I just googled deer outline and found the one above from Pinterest that I loved!

Print out the image in a 8 x 10 printed format (so the image is larger in size).
Next cut the deer silhouette out. Then trace the image onto an element. This is were you can get creative, you can use funky paper for the background such as chevron, stripes, shabby chic flowers, you name it (do it and show me please!). How cool would it be traced onto a piece or wood?
Okay so next after tracing the silhouette just simply fill in the image with a permanent marker. Yep that's it! I made one framed the bad boy and gave it to my father as a gift. It looks like a piece of art work and little does he know I did it in less then 10 minutes. SHHHHHHH......


Tuesday, December 17, 2013

{DIY} beanie/hat

So I spotted these cute hats at Wally World aka walmart in various colors and they had potential!! I couldn't pass them up at a whopping $.87 cents!! So I grabbed one and got crazy!! The fun thing with these is you could do so much!! I went off the happy cheery little girl that I was making this for and decided to add little bright colored fabric flowers to it!! For this little project all you need is three strips of fabric, glue gun, scissors, and your hat! 
Then create your little flowers by glueing and wrapping the fabric in a circle! 
You next and final step is to glue them in place! One could use fabric glue but I just choose to glue them down with the glue gun! 
And you now have a super adorable extra sweet hat for a grand total of $.87!! Can't beat that!! Now what are you waiting for!! 

Wednesday, August 21, 2013

{DIY} labels

I got these super cute baskets at a garage sale for 5$ or all 3! I thought they would be perfect for the mess in my daughters room. Plus they are super duper cute! So I wanted to make labels for each (for my daughter and my hubby hehe).
 
Heres what you need
  • Scissors
  • printer/computer
  • cardstock
  • labels (right click them and save!)


 - side note - you can also make your own labels using www.picmonkey.com. They have super cute labels under *overlays* and labels.
 Heres how you create your own. First you have to right click and save this blank page here
right click blank area above and save
 
Now you open this blank picture onto picmonkey. Then you go to overlays and under overlays you go to labels. Play with them a bit so that you can customize them to your shape and color that you would like your labels to be. Then you go under the "p" on the left hand side of the page {at picmonkey} Which is the text. You make a "add text" and put the text inside the label. In my case I used blankets, toys, and stuffed animals. You could do this with anything! Options are endless people! Then I printed them out. I printed them out on cardstock (cardstock is much durable and can be found at walmart.) I printed the labels so that the layout I selected was "4x6" size so that they were smaller and didn't take up the whole page (could fit 2 labels per page). I cut them out with a paper cutter (so that the edges or even) but you can just use a scissors as well. I clipped them on the basket with two clothes pins and fell in love! HAPPY LABELING to all!!!! xoxo


Friday, August 2, 2013

{DIY} Hose Wreath


This one is the simplest of simple!! You need 3 things:
A hose 
Fabric/rope/ or in this case I used twain
Flowers {fake or real} 

I saw this idea and I had to recreate one!! I found this hose at a yard sale for $3. 

Okay prepare to be amazed! Just wrap around in circle to the size wreath you want. Grab the twain and tie around the wreath. I tied it around in 3 different spots just so it would keep a nice organized circle. I added the fake flowers and tahdah! You have an adorable spring/summer wreath. The one I saw had dark pink tulips which was pretty darn cute!! Thanks for stopping by! Xoxo Katie 

Thursday, August 1, 2013

Chevron wall art {DIY}


This one is super easy and cheap!!! Plus makes an awesome statement piece, using the popular chevron design!
First you will need:
Two paint colors of choice
Paint brush
A 24" x 24" board {this can be purchased at Menard's pre-cut in the lumber area!} roughly $2-$3
Painters tape 
E6000 {glue}
Paper & pencil {to make chevron pattern}

First things first paint your board with one of your color choices!

While waiting to dry make your chevron pattern! Click here for your CHEVRON how-to
 
Once you have made your chevron pattern and your paint is dry you are ready for your next step! Taping the chevron pattern onto your board with your painters tape! I double up my painters tape just to get a wider chevron stripe.

 Once you have completed your pattern, cover it with your opposing color! Oh boy; at this point the anticipation builds as you are waiting for your paint to dry! Getting so close to seeing the end result!! Ahhhh! The suspense!  

As you are biting your nails waiting to remove the tape you can prepare the frame! We have found 8x10's at the dollar store which we repaint and sand the edges to give it  a shabby look, we also have used thrift /rummage finds, and this one pictured is from Hobby Lobby which was around $7.00. Just depends on the look you are going for! Plop the picture of choice in frame. Remove the picture standing up thingy on the back of frame if there is one because this will allow your frame to sit flat against the board. Once your 2nd paint is dry remove the tape! Yippie! That's our favorite part! Now slap on some E6000 on the back of your frame and place in the middle of board! Wait to dry before hanging. Add some picture hanging hooks on back and hang! Take a few steps back and admire your work of art!! Share with us suggestions or comments! We Love to hear from you! Xoxo the White House girls


Friday, July 19, 2013

No Sew {DIY} BowTie

 
We spotted these adorable little bow ties at Target & also a local pet store for dogs & we had to have one!  But I had such  a hard time spending $6-$14 on one! {weird I know, but I knew there had to be a cheaper way}  I told Betsy that we were going to create our own!  So that is exactly what we did!!  This is a great project for little fabric scraps you may have laying around!  Also it is a great little project to do with your kids {as long as you are the one operating the glue gun} Betsy and I had a blast!  After we made a couple we were adding bobby pins to them to use as little boys bow-tie, ADORABLE, and also in a little girls hair!  One can seriously have so much fun with these!!  Here is what you need to get started:


What you need:
Fabric {roughly 9 in x 5.5 in}
Glue gun
glue sticks
scissors
elastic {if making for a doggie collar}
Bobby pin {if making a hair clip or for little boy}

Cut out a piece of your fabric so it roughly measures 9x5 inches.  Also cut a little extra piece that is about 2 inches long that will be your center of the bow-tie. 


Start up that glue gun and get prepared to glue! 

Fold the other half over and glue down.

Take one side and fold in half. Glue Down.
Now take the  other overlapping a little and glue down.  You are getting so close to being complete!
If you pinch the middle you will see your bow tie coming together!!

The  little piece that you cut out for the middle I glued the sides in so it creates a nice seam!
Wrap around bow-tie and glue down in back where your seam is!


Glue your elastic in a little circle and now glue that down to your bowtie in back!! {I had elastic that was probably 1/2 thick I even cut that in half so it wasn't so thick, you just need a little piece and it truly needs to be a small circle so it fits snuggly against the collar.}


Attach to collar!  Such an adorable photo prop!  Our Little Charles sports his collar with pride! 

Here a couple examples our other ideas! 


 Run with  it!  Share with other ideas that we  may have missed!  Thanks for stopping by!
xoxo Katie
The  White House Girls


Monday, July 15, 2013

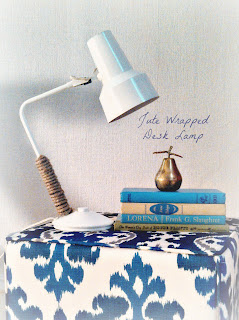
Jute Wrapped Desk Lamp {DIY}

Here is my inspiration.....ahhhh swoon.....
This can cost you though a hefty price tag of 55$! But it is adorable! So I wanted to do something similar to this guy I got at a thrift store for $2! And it screamed MAKE ME PRETTY!!
It had this black base bottom thingy that I wanted to jute dazzle!
What you will need
1.Scissors
2. Jute (you can buy at any local hardware/walmart store for a couple bucks)
3.Glue gun and glue


So you plug in your glue gun and wait for it to warm up. You then put glue on the lamp and you wrap your jute around the stem of the lamp. I do a little area at a time so that the glue does not harden. Make sure to pull the jute tight so that it wraps nicely around the stem of the lamp.
 
You continue to do this until you reach the top of your designated area. When you are finished wrapping it you cut the jute off with the scissors then glue the remaining end of the string of jute onto the lamp. Yep and your done! Its so easy I tell you what! And it makes it look a million times better! I might want to do this to another larger lamp and get a bit more daring? Stay tuned.........