Showing posts with label shabby chic. Show all posts

Thursday, January 9, 2014

Living Room {Before and After}

Hello! I am one of the two sisters from The White House Boutique. I wanted to share some of my home makeover with you all! My hubster and I moved into our {1st} home a little over a year ago and I've just recently FINISHed my wallpapered fiascled living room. It is a 1890's house with no straight walls and or straight windows {so it made re-wallpapering quiet difficult}. My living room was covered with this pink flowery not so cute stuff (see picture below), that I couldn't paint over it. After several painstaking months upon months of taking this flowery stuff off, I realized I couldn't paint the wall as well, due to all the imperfections this old house blessed me with. Wallpaper my friends {which I now believe should of never been invented} is tougher than it looks. Every wallpapered room I now enter I have a lot more respect for. So lets get down to it.

Here is the before {like the waaaaayyyy before, previous owners that is.}


The During
I do have to admit I'm a bit embarrassed by this photo. Our house looked like this for several months!


 Although the wallpapering may not be perfect. I do love my new living room. And all the imperfections of my old house.

One of the downfalls (as seen in the two pictures below) of a old house is the wiring. My husband or I aren't electricians and the closest we know of one is my father (whom can literally do everything I swear). He said the best way to get my chandelier in the room is to hang it from the ceiling and plug it in. So now I have this ugly cord thing in the center of my wall (we are planning on fixing it) but for now I'll take the chandelier glistening in the room any day even with the ugly cord!


 The fun thing about this room (which is the same in all my rooms) is that I got 98% of this stuff at a thrift store (and I'm proud to say  I am a cheapy) and or DIYs. My favorite thing in this room is the yellow couch, I scored it at a second hand store for $275! The rugs? Wal-Mart for $30 each! The chandelier? 50$ at a garage sale! The piano? FREE! The chevron chair? $2 at a thrift store and I reupholstered it for under $7! Book shelf?- 10$ at garage sale! Owl lamp?-$5 garage sale! Map wall art?-$1 garage sale! I could go on and on my friends (it makes me so excited) haha. :) 

Friday, May 31, 2013

{DIY} area Rag Rug

Truly ladies and gentleman this one anybody can do! As long as you have yourself a needle and thread and you found yourself some cute rag rugs your in business!! I came across these adorable rugs at a thrift store for $2 a piece!! I grabbed 9 of them with this idea in mind!! Again husband looked at me like I was crazy! But little does he know those are the looks that keep me thriving!!
The first thing I did was lined them up on the floor according to the shape and size that I wanted! Next I grabbed a large needle and embroidery thread and went to town hand stitching together the seams! I choose embroidery thread because of its extra strength but I also think fishing string would work wonders as well!! A lesson learned and tip-the extra little threads that hang off the ends of the rugs do NOT fully cut off before sewing together (your rug will fall apart) just trim them up to the knot! Once finished I have a beautiful rag area size rug!! The best part about it is that it was $22! And to put icing on the cake it's super super adorable!! Now go get your rugs and get your sew on! Enjoy!! 


Thursday, February 21, 2013

Unique {gift} on a budget


This truly can be given at anytime, any moment, for any reason....well you get it!  It's a handy dandy gift to give when you are in a bind trying to give that perfect something with meaning and {something that doesn't cost a fortune} As you have probably noticed throughout our blogs we like to be penny savvy {every penny we save is a penny that can be spent thrifting.  Truly $1 and go a long way!}  
I saw this idea on pinterest and checked out Shanty-2-Chic Blog!

LOVED IT!  I just tweaked it a little to fit the style I was looking for.  Here is my quick version of this letter art!

What You Need:
  • 4x6 frames from the Dollar Store {amount depending on the length of name}
  • A board that is pre-cut from Menards or Home Depot or a Salvaged Piece of wood that already has character  {tip I brought my frames inside the store so I made sure that the name would fit on their nicely} This usually costs in between $5-$10
  • Stain/old rag
  • Paint/paintbrush in this case I just used a white indoor latex paint
  • ruler
  • E600 glue and this can truly be found anywhere {Menards, Micheals, Acme Tool, Walmart etc}
  • vaseline {you will see why in a little bit}

Start off by staining your piece of wood.  I did this step so when you paint it and sand it, it has some contrast between the white paint and the wood to give it a rustic/vintage look.

Let the stain dry overnight.  The next step is to rub Vaseline around the edges of the wood on the corners and random spots on the wood.  Where you place the Vaseline the paint will not adhere as well and you can rub it off giving it an amazing look. See picture below! 
Once you get your Vaseline in all the right spots paint board! & take apart the frames and paint the frames while you are at it as well!

Once they are dry take a piece of sand paper and lightly sand the edges of the frames, and the wood where you had applied the Vaseline!

It's starting to come together! 
Now it's the fun part to pick out they style of letters to go in the frames!  There is an awesome Flickr site that has tons of letters to choose from!  Download those letters you can either print them off right there at home or I had them printed at a photo center just to give them a glossy more professional look!
Add the glass back to the frames insert your picture {On some frames you cannot add the cardboard piece back on because it will stick out from the wood, some just remove the standing thing but I just left the entire thing off completely}
Add your E600 to the back of the frame {make sure your frame is all measured out evenly} and stick into place.
Allow glue to dry and then add your hanging hardware to the back and That's it!  You have an amazing gift for that special someone.  Super cute for a new baby, wedding gift, house warming gift, anniversary, "it's the gift that keeps on giving".  hahaha. Love that line! Enjoy! And Thank you Shanty-2-Chic for your inspiration!


Friday, November 30, 2012

{DIY} Deck the Halls with WREATHS


It's here....It's finally here...our DIY on our version of a vintage shabby Music/book wreath.
Here is what you NEED:
  • music sheet paper/ pages out of a book {25}
  • glue gun/ glue stick
  • paper plates or cardboard- this will be what you glue the paper to
  • elmers glue
  • glitter 
  • small piece of ribbon
  • crepe paper
  • notions of your choice
To get started heat up your glue gun and wrap around roughly 25 sheets of your paper so it creates a cone shape.  Next cut your paper plate or cardboard into a circle I cut the ribbed edges off a paper plate so I have a nice flat surface to work with.  Once you get your cones created I still use my glue gun and start gluing them onto the plate/cardboard.  I start by making a cross {see picture above}  Once those are stuck on there good I go ahead and glue cones in between the two cones {see picture above}  I continue this process once more. Once you have it filled in I turn the plate around and fill in the back sparingly but where needed {this just gives it a little bit more fuller and 3D look!
  Your wreath should be coming together at this point!  Once you are finished filling in the back grab your ribbon and create a loop so you have something to hang it from {see picture}.
 Turn around and create your center {focal point}  I usually take crepe paper and create a rosette for the center...glue on....
then I usually add a notion of choice {can usually find these at any local craft store in the holiday section}  In picture above I purchased some glitter letters and added the word JOY!  Being its a JOYful season and all!  I also had these cute banners that read NOEL!  Have I mentioned I LoVe ChRiStMaS!!

Then for a little extra glitz I have added glitter in the corners of the pages/cones {see picture}.  You have now created your very own gorgeous music WREATH!  They are truly very cute with book paper as well!  Would be great for the book worms during Christmas!!   I think I know what my daughter will be giving to her piano teacher as a Thank you Christmas Gift!  Let me know if you have any questions!  Thanks for stopping by!


Friday, November 16, 2012

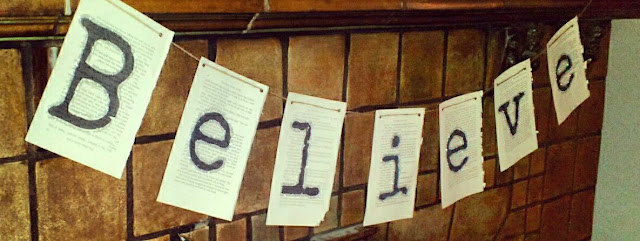
DIY {believe} Banner


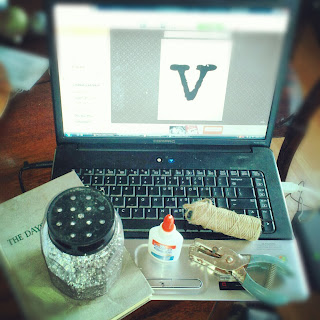
This weeks DIY is this shabby chic book page banner....so cute hung above your mantle, windows, pretty much anywhere!  Super easy and here is what you need:

  • a random book you don't mind destroying
  • computer/printer
  • glitter
  • glue
  • twain
  • painters tape {optional}


Here are the steps
  1.  First you need to decide what you want your banner to say {in this case I choose the word BELIEVE} one of my favorites for Christmas!  Tear the pages out of your book carefully making sure to get the full page from the binding.
  2. Next pick a program on your computer to type the letters.  You will be printing them one letter at a time.  I like to use the program picmonkey.com but your microsoft word, or photo editors will be able to do this for you as well.  
  3. Make your letter quite large so it takes up at least 3/4 the page.  When printing make sure that you are printing a 5x7 so it will fit on your book page.  I print from windows photo gallery.  I cheat and tape my book page with painters tape {this way it won't tear the paper when you take it off} to where it will print on an 8.5x11 sheet of paper.  See pictures below!  Print our your letter.  


4. Once you have created your word, I added a little glitter around the edges of the letter just to give it a little extra Winter sparkle.  
5. Punch holes in both corners of each letter in the upper right and left corners!
6. String with your twain {or any ribbon of choice} and you  have now created your banner!!                 
Merry Making!!